Lyra ALS
Lyra ALS
这篇文章是课程 Unreal engine 5:Advance locomotion system ALS (Intermediate) 的笔记。这个课程就是重新实现了一遍Lyra工程中的角色动画,工程仓库:https://github.com/BanMing/LyraALS。课程是全蓝图,我在实现时,把蓝图转换为C++了。
Idle Animation
Idle Switch
有四种实现方式:
状态机
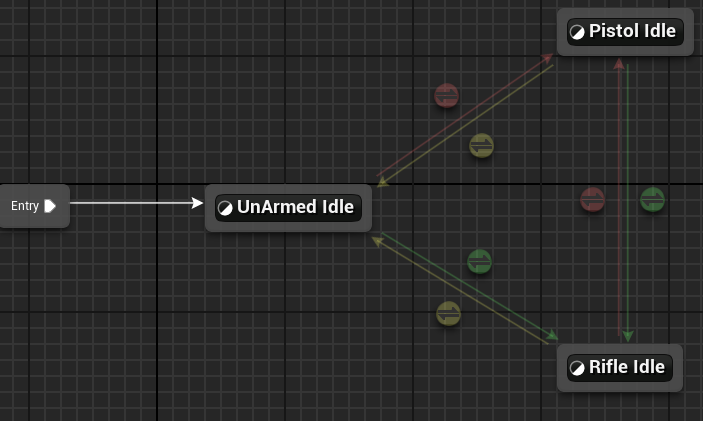
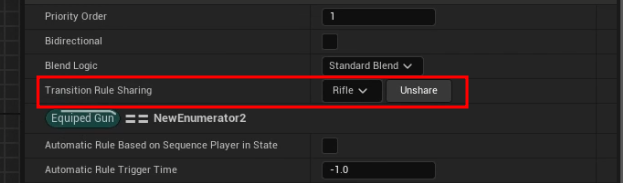
Transition Rule Sharing
共享跳转条件,在转换条件中可以设置:
通过整数混合

通过枚举混合
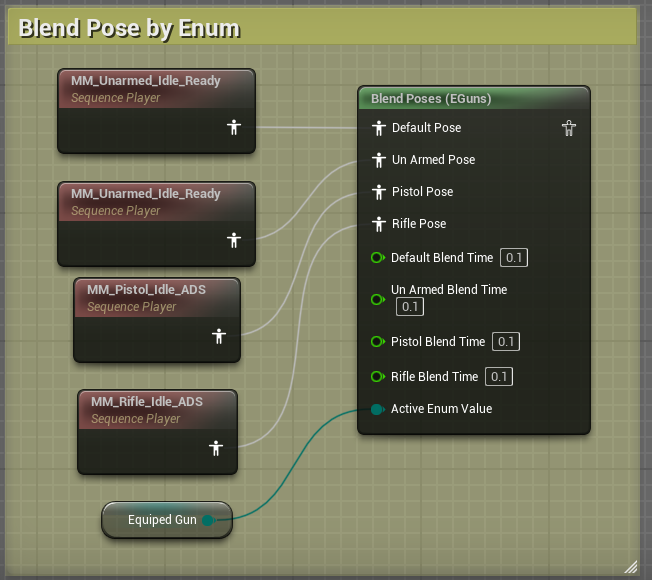
序列播放器
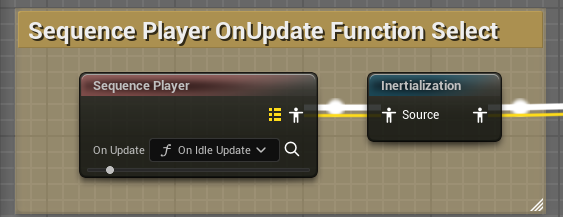
使用Update方法绑定
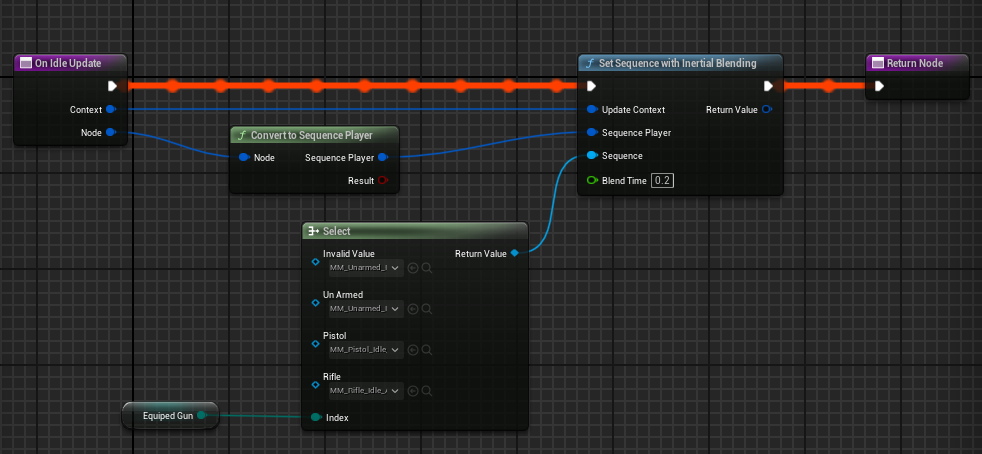
这里使用的了惯性插值。这是一个对性能友好的插值。具体讲解:
Linked Animations
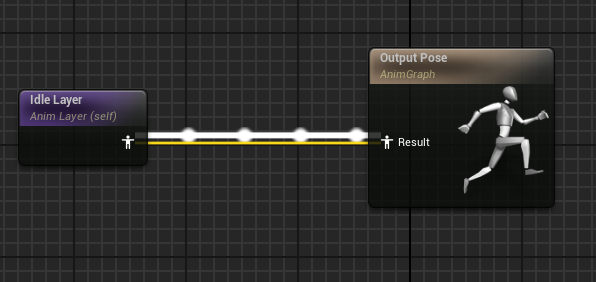
Animation Layer
Animation Layer就是在动画图中的函数,用来封装动画图的中的逻辑。
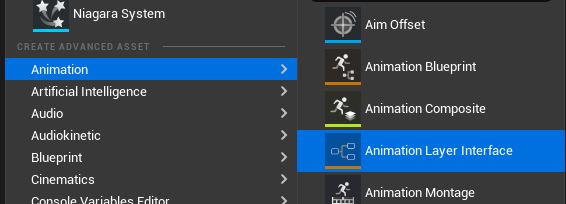
Animation Layer Interface
跟动画蓝图的接口差不多,只是它适用于动画蓝图,创建位置:
设置位置跟蓝图接口位置一样。
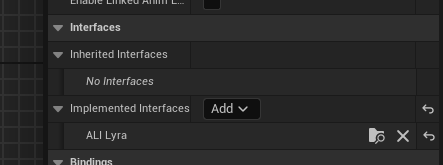
设置后,直接在动画蓝图的Animation Layers中找到在接口里声明的方法实现即可。
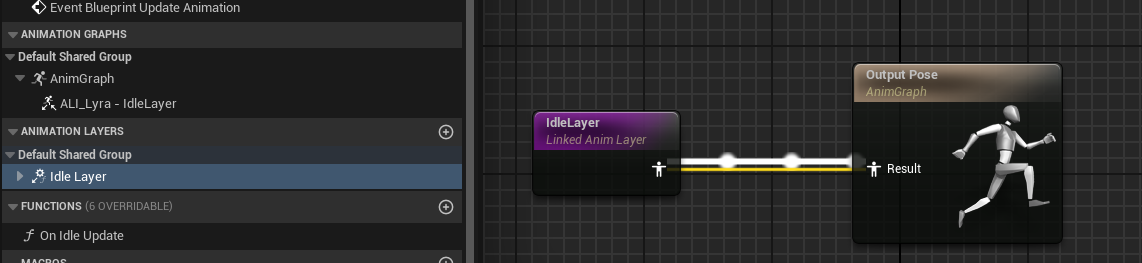
LinkAnimClassLayers
可以使用 LinkAnimClassLayers 方法实现重载动画蓝图接口。简单来说:
动画蓝图层级接口类 I 中有 IdleLayer动画蓝图A继承接口I,实现IdleLayer动画蓝图B继承接口I,实现IdleLayer在角色的Mesh上设置动画蓝图A• 在运行时,可以把动画蓝图A中的IdleLayer替换为动画蓝图B的实现。
Property Access
文档:https://dev.epicgames.com/documentation/en-us/unreal-engine/property-access-inunreal-engine
可以在非游戏线程中访问游戏线程的数据,这里有个比较特殊的点是在定义绑定方法的返回值时,返回值的名字一定是 ReturnValue
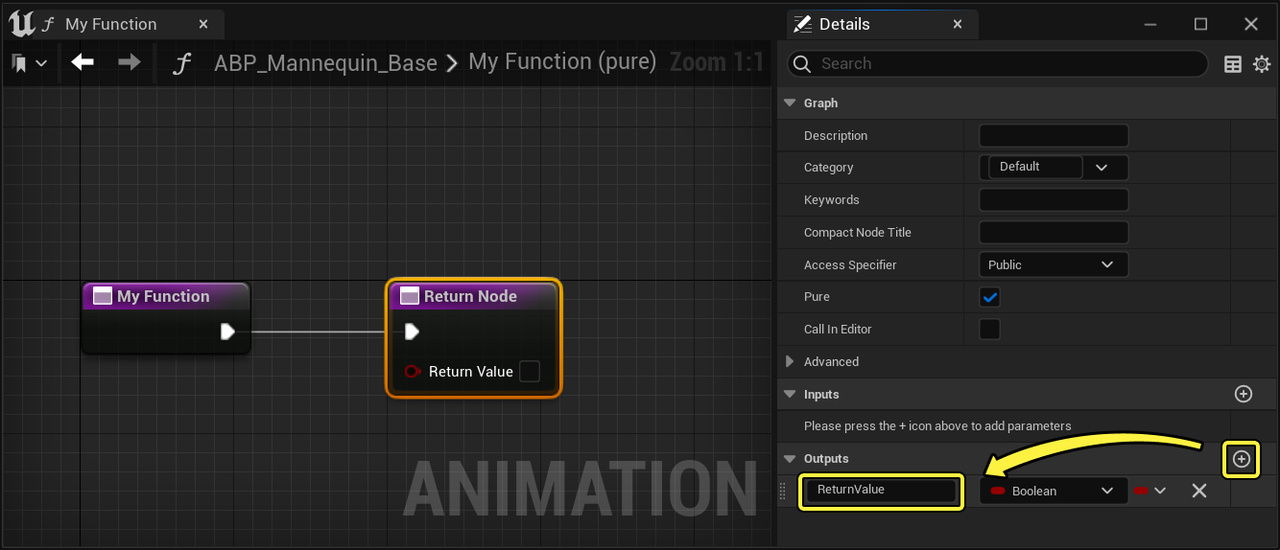
关于在 c++ 中使用这个属性:https://forums.unrealengine.com/t/animation-property-access-system-in-c/541917/17。
直接重载这个方法,在该方法中编写数据即可。
virtual void NativeThreadSafeUpdateAnimation(float DeltaSeconds) override;
Locomotion Cycle Animation
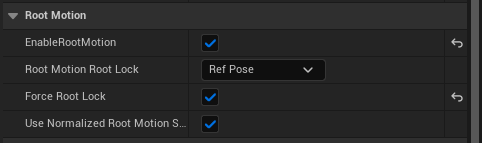
Root Motion
值得注意的是,角色的移动是由程序来控制,但是为了解决滑步和45°移动这些问题,使用了插件Motion Warping,这个插件是去处理在动画使用Root Motion时,程序介入改变Root Motion移动的位置或旋转。所以在动画设置中既需要打开Root Motion,也需要打开Force Root Lock。
CalculateDirection
UKismetAnimationLibrary::CalculateDirection 这个方法十分有用,用来计算速度和角色之间的夹角。
/**
 * Returns degree of the angle between Velocity and Rotation forward vector
 * The range of return will be from [-180, 180]. Useful for feeding directional blendspaces.
 * @param        Velocity   The velocity to use as direction relative to BaseRotation
 * @param        BaseRotation   The base rotation, e.g. of a pawn
 */
UFUNCTION(BlueprintPure, Category="Animation|Utilities")
static ANIMGRAPHRUNTIME_API float CalculateDirection(const FVector& Velocity, const FRotator& BaseRotation);
Dead Zone
把移动动画分为4个方向,为了解决角色已经在某个方向了,在此方向稍微偏移一点角度,角色就会立马改变方向的问题,设计一个缓冲区域。也就是扩大当前方向的角度。
// // // // // // // // // // // // // // //
// ForwardMin         Forward        BackwardMax
//     ↖                0°                ↗
//                - - - - - - -
//                | ↖ | ↑ | ↗ |
//                - - - - - - -
//  -90° Left | ← | o | → | Right 90°
//                - - - - - - -
//                | ↙ | ↓ | ↘ |
//                - - - - - - -
//         ↙        -180°/180° ↘
// BackwardMin         Backward        BackwardMax
// // // // // // // // // // // // // // //

// Check dead zone
switch (CurrentDirection)
{
        case ELocomotionDirection::Forward:
                if (CurVelocityLocomotionAngle > ForwardMin - DeadZone && CurVelocityLocomotionAngle < ForwardMax + DeadZone)
                {
                        return ELocomotionDirection::Forward;
                }
                break;
        case ELocomotionDirection::Backward:
                if (CurVelocityLocomotionAngle > BackwardMax - DeadZone || CurVelocityLocomotionAngle < BackwardMin + DeadZone)
                {
                        return ELocomotionDirection::Backward;
                }
                break;
        case ELocomotionDirection::Left:
                if (CurVelocityLocomotionAngle > BackwardMin - DeadZone && CurVelocityLocomotionAngle < ForwardMin + DeadZone)
                {
                        return ELocomotionDirection::Left;
                }
                break;
        case ELocomotionDirection::Right:
                if (CurVelocityLocomotionAngle > ForwardMax - DeadZone && CurVelocityLocomotionAngle < BackwardMax + DeadZone)
                {
                        return ELocomotionDirection::Right;
                }
                break;
}
Stride Warping
这是一个解决滑步的节点,需要启动 Animation Warping 插件。
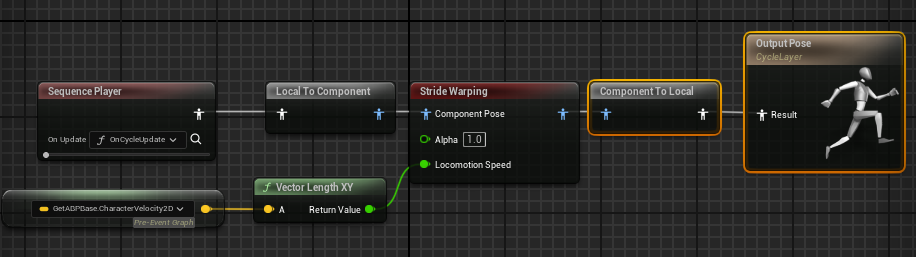
具体的配置如下:
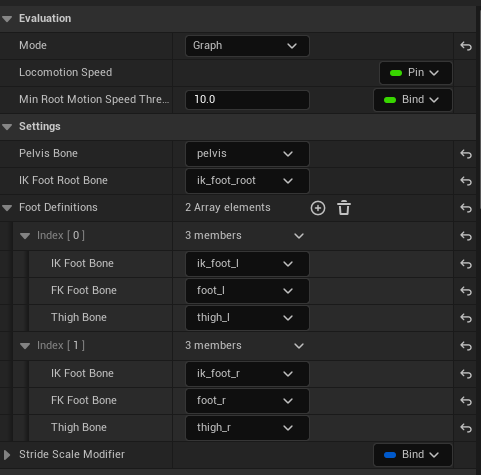
这里会用到骨骼上的ik节点,如果是自定义的骨骼,这里需要加上ik的节点,可以参考SK_Mannequin中的设置。
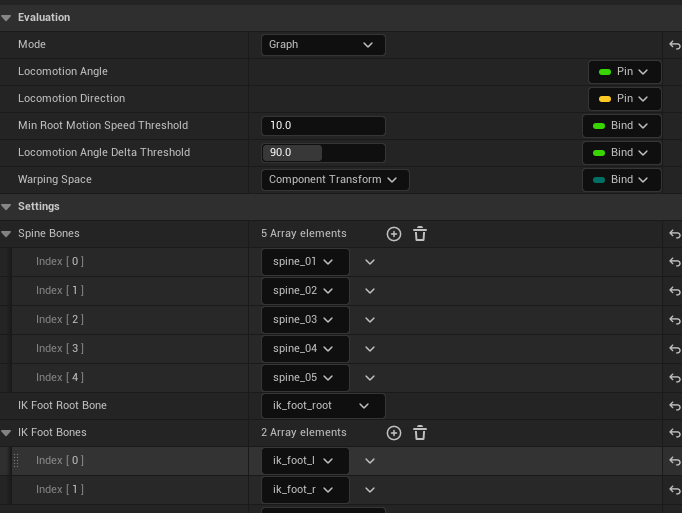
Orientation Warping
使用该节点可以制作角色斜方向的移动。
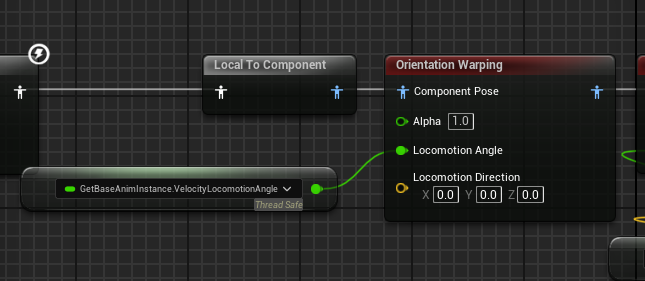
同样也是使用的ik来实时计算的,具体配置如下:
Lean Animations
使用叠加动画做偏向。动画叠加设置:
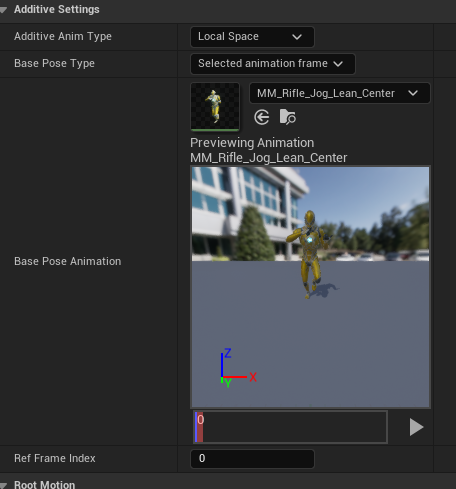
把左右方向的偏移做成BlendSpace: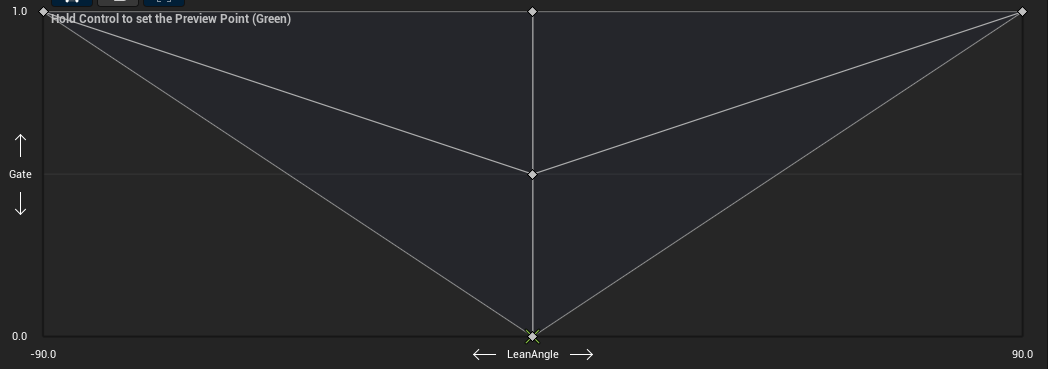
横坐标:偏移角度[-90,90]纵坐标:步伐[0,1],移动到跑步。
需要设置一下 Smoothing Time ,多个动画切换更加的自然。
在动画蓝图中设置如下:
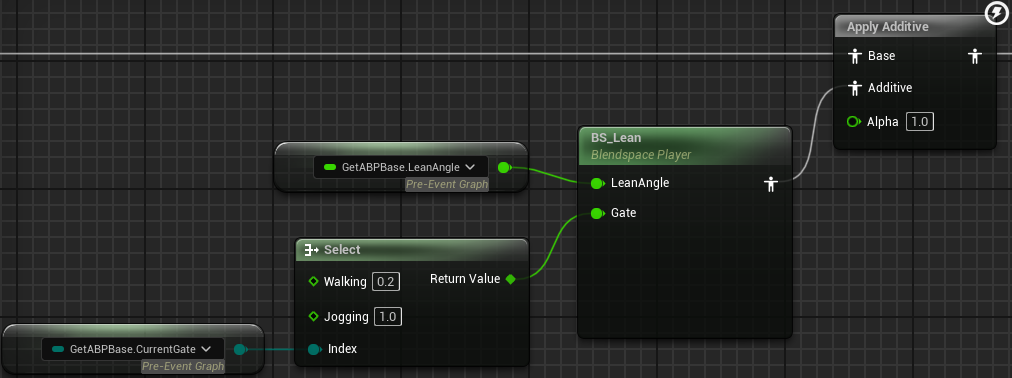
偏向角度通过角色Actor这一帧的Yaw轴旋转与上一帧的Yaw轴旋转的相减得到。
LastFrameActorYaw = ActorYaw;
ActorYaw = WorldRotation.Yaw;
DeltaActorYaw = ActorYaw - LastFrameActorYaw;
LeanAngle = FMath::ClampAngle(DeltaActorYaw / (LeanFactor * DeltaSeconds), -90.f, 90.f);
if (LocomotionDirection == ELocomotionDirection::Backward)
{
    LeanAngle *= -1.f;
}
Stop Animation
Stop Layer
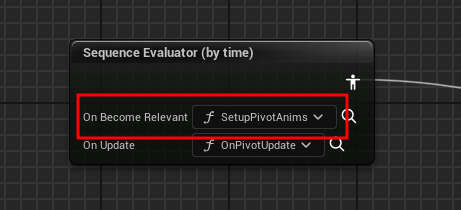
与Cycle Layer相似,不过这里使用的使用的是 SequenceEvaluator 来播放停步动画,不同的是 SequenceEvaluator 可以设置播放时间的偏移。这样就可以在停步时,根据停止点去动态适应不同的
播放时间。
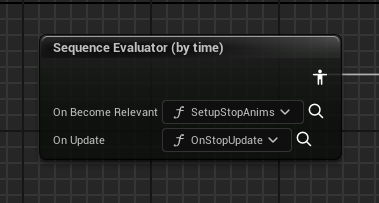
这里绑定了两个方法:
SetupStopAnims:根据角色移动方向选择不同的停步动画OnStopUdate:动态设置播放时间点,推进 SequenceEvaluator 播放时间
Stop Location
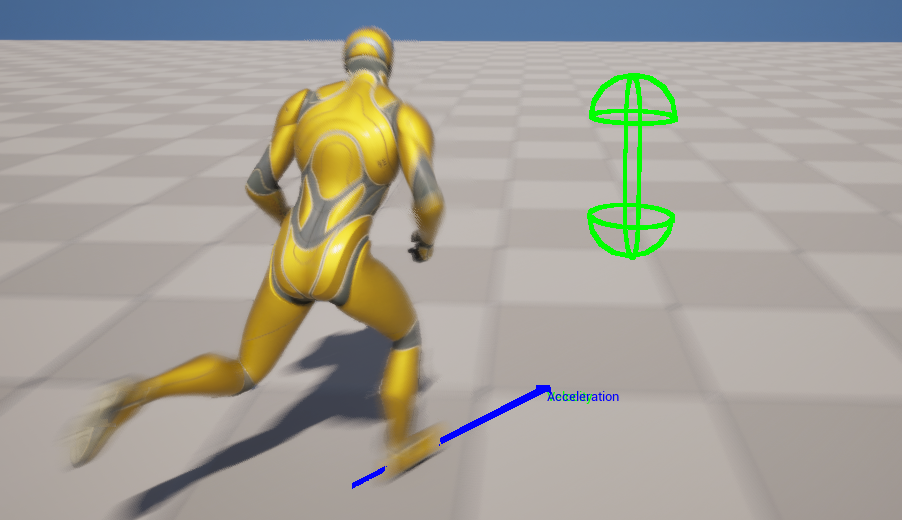
使用了 AnimationLocomotionLibrary 插件中的方法 PredictGroundMovementStopLocation 来计算出未来可能的停止点。
/**
 * Predict where the character will stop based on its current movement properties and parameters from the movement component.
 * This uses prediction logic that is heavily tied to the UCharacterMovementComponent.
 * Each parameter corresponds to a value from the UCharacterMovementComponent with the same name.
 * Because this is a thread safe function, it's        recommended to populate these fields via the Property Access system.
 * @return The predicted stop position in local space to the character. The size of this vector will be the distance to the stop location.
 */
UFUNCTION(BlueprintPure, Category = "Animation Character Movement", meta = (BlueprintThreadSafe))
static FVector PredictGroundMovementStopLocation(const FVector& Velocity,bool bUseSeparateBrakingFriction, float BrakingFriction, float GroundFriction,float BrakingFrictionFactor, float BrakingDecelerationWalking);
简单来说就是根据当前的速度和一些停止的速度参数得到未来的停止点,这些参数都可以在 UCharacterMovementComponent 中获取到。
Distance Curve
可以根据停止点获得当前角色位置离停止点的距离 Distance 。因为停止动画本身是带有位移信息,就可以根据 Distance 来设置动画播放的时间点。
动画位移数据可以使用曲线的方式获得。使用插件 Animation Modifier Library 可以自动画出位移曲线。
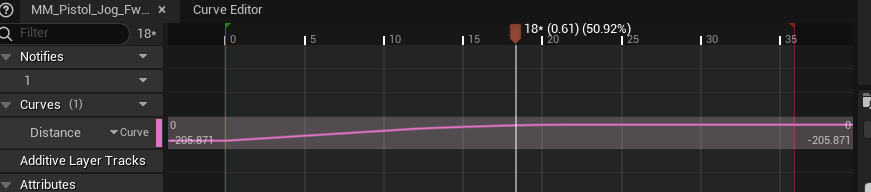
点击 Window->Animation Data Modifier 打开面板,选择添加 DistanceCurveModifier ,最后点击 Apply All Modifiers 即可。
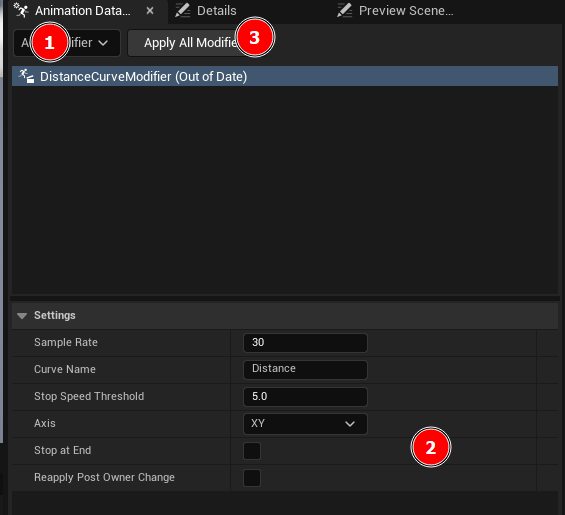
这里可以选中所有停止动画,来生成距离曲线。
Distance Match
使用了 AnimationLocomotionLibrary 插件中的方法 DistanceMatchToTarget 来设置 SequenceEvaluator 的播放时间。
/**
 * Set the time of the sequence evaluator to the point in the animation where the distance curve matches the DistanceToTarget input.
 * A common use case is to achieve stops without foot sliding by, each frame, selecting the point in the animation that matches the distance the character has remaining until it stops.
 * Note that because this technique sets the time of the animation by distance remaining, it doesn't respect phase of any previous animation (e.g. from a jog cycle).
 * @param SequenceEvaluator - The sequence evaluator node to operate on.
 * @param DistanceToTarget - The distance remaining to a target (e.g. a stop or pivot point).
 * @param DistanceCurveName - Name of the curve we want to match
 */
UFUNCTION(BlueprintCallable, Category = "Distance Matching", meta=(BlueprintThreadSafe))
static FSequenceEvaluatorReference DistanceMatchToTarget(const FSequenceEvaluatorReference& SequenceEvaluator, float DistanceToTarget, FName DistanceCurveName);
原理就是根据当前角色位置到停步点的距离 DistanceToTarget ,获取到 DistanceCurveName 曲线中相似距离的点,该点就是播放停止动画的时间点。
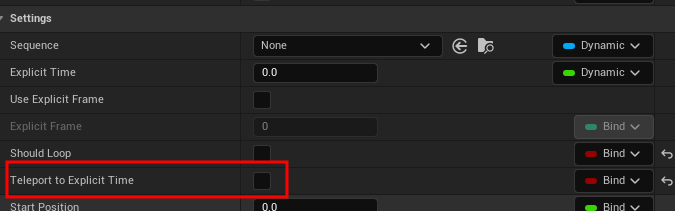
Orientation Warping
与Cycle相同, Orientation Warping 节点来实现。不同的点是需要把 SequenceEvaluator 节点上的 Teleport to Explicit Time 关上。
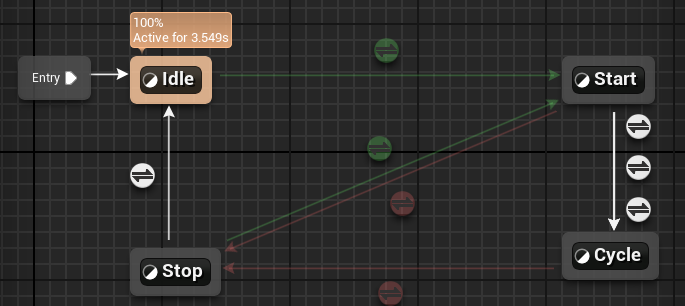
Start Animation
实现的逻辑与Stop Animation是一样的,不同的点是开始不需要计算停止位置,但是还是需要使用Distance Matching来控制起步动画播放的时间点。使用了 UAnimDistanceMatchingLibrary 中的方法 AdvanceTimeByDistanceMatching 来设置 SequenceEvaluator 的播放时间。
/**
 * Advance the sequence evaluator forward by distance traveled rather than time. A distance curve is required on the animation that
 * describes the distance traveled by the root bone in the animation. See UDistanceCurveModifier.
 * @param UpdateContext - The update context provided in the anim node function.
 * @param SequenceEvaluator - The sequence evaluator node to operate on.
 * @param DistanceTraveled - The distance traveled by the character since the last animation update.
 * @param DistanceCurveName - Name of the curve we want to match
 * @param PlayRateClamp - A clamp on the effective play rate of the animation after distance matching. Set to (0,0) for no clamping.
 */
UFUNCTION(BlueprintCallable, Category = "Distance Matching", meta=(BlueprintThreadSafe))
static FSequenceEvaluatorReference AdvanceTimeByDistanceMatching(const FAnimUpdateContext& UpdateContext, const FSequenceEvaluatorReference& SequenceEvaluator, float DistanceTraveled, FName DistanceCurveName, FVector2D PlayRateClamp = FVector2D(0.75f, 1.25f));
动画状态机也进行了变更:
Pivot Animation
急停动画,实现与Start Animation相似。Base状态机添加动画状态:
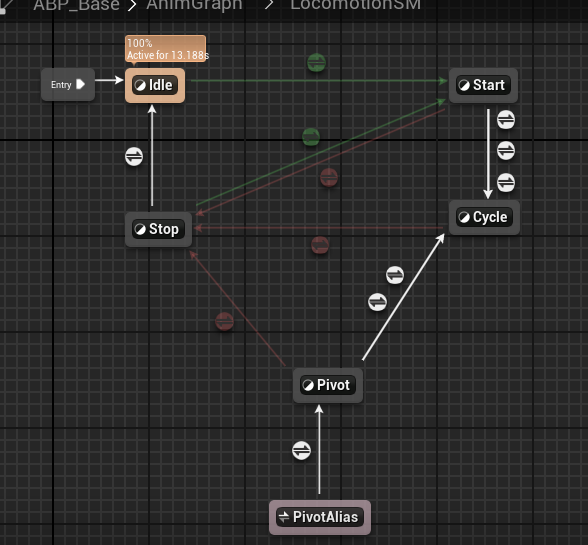
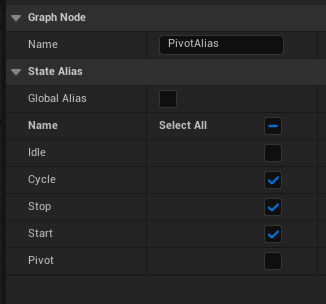
State Alias
为了减少各个状态之间的直接连接带来的混乱,使用匿名的状态来设置哪些状态可以跳转到特定的状态。
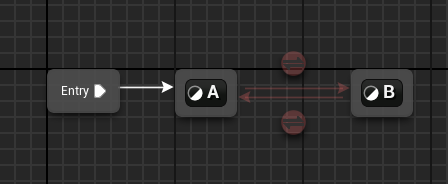
Pivot State Machine
在Pivot Layer中设置两个相同的状态,因为在急停播放时,可能会触发另一个方向的急停。
这里课程中有一点问题,在计算两个状态切换时,这里的急停加速度(PivotAcceleration)应该与当前加速度(CurAcceleration)作比较。
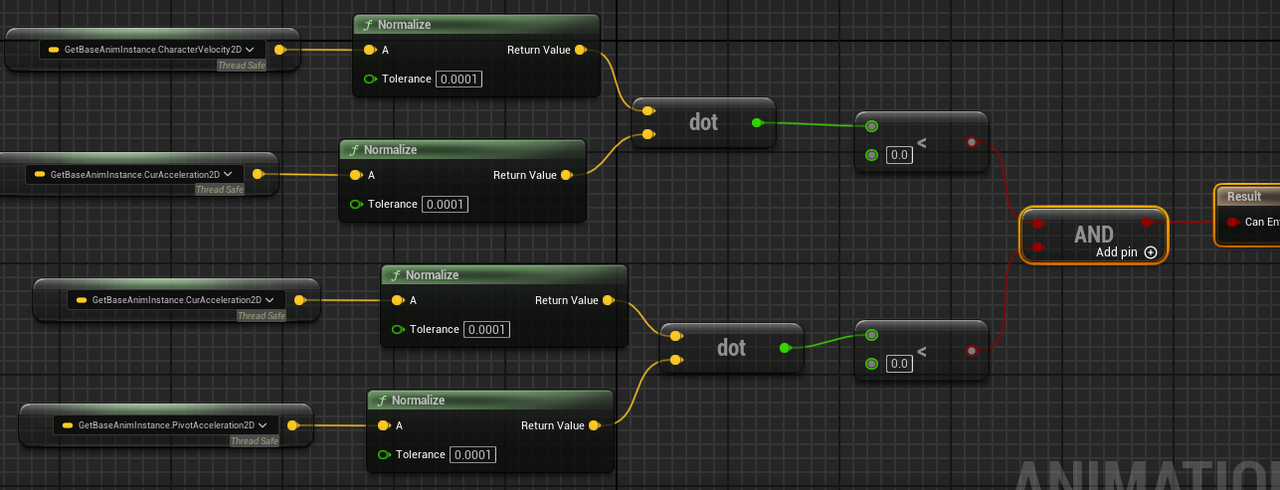
与此同时急停加速度应该放在,急停动画开始时进行记录。这样两个急停状态互相切换就没有问题。
同时也不需要在急停动画的Update方法中实时检测当前动画是否播放正确。
Turn In Place
这个功能是镜头先旋转,角色会滞后旋转到镜头正方向。镜头旋转超过一定的角度时,才会触发角色旋转。这个功能仅在角色处于Idle状态时应用。
这个功能实际的旋转的值是由程序来控制的,将分为两部分来实现:
逻辑:角色的旋转,在ABP_Base中实现。
表现:角色旋转动画的播放,在ABP_Layers中实现。
Turn Logic
Root Yaw Offset
相机的旋转时跟着PlayerController的
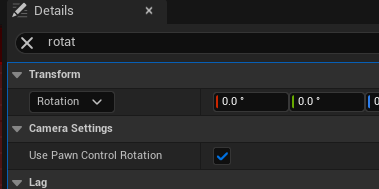
同时角色的Yaw轴的旋转也是跟着PlayerController的
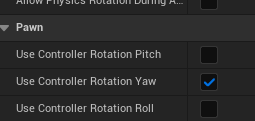
所以相机的Yaw旋转和角色Yaw轴旋转是一样,这里就需要添加旋转偏移。偏移直接使用计算角色偏向角度时用到的DeltaActorYaw作为基础即可。
RootYawOffset = UKismetMathLibrary::NormalizeAxis(RootYawOffset + DeltaActorYaw * -1.f);
因为是要还原角色的旋转所以这里需要乘上-1,同时这个偏移角度应该是(-180,180)的范围。
Rotate Root Bone
把偏移旋转应用到角色上,使用Rotate Root Bone这个动画蓝图的节点。
动画蓝图中的节点:
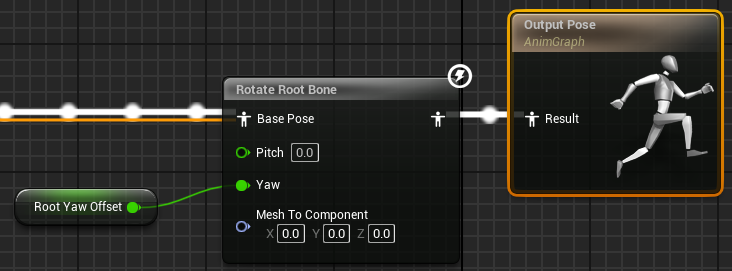
因为该功能只在Idle状态下生效,所以需要设置一个状态RootYawOffsetMode 来区别移动和待机。
- Accumulate 待机状态
- BlendOut 移动状态,RootYawOffset的值应该为0,这里对其做了插值处理。
if (RootYawOffsetMode == ERootYawOffsetMode::Accumulate)
{
    RootYawOffset = UKismetMathLibrary::NormalizeAxis(RootYawOffset + DeltaActorYaw * -1.f);
}
else if (RootYawOffsetMode == ERootYawOffsetMode::BlendOut)
{
    FFloatSpringState RootYawOffsetSpringState;
    RootYawOffset = UKismetMathLibrary::FloatSpringInterp(RootYawOffset, 0.f, RootYawOffsetSpringState, 80.f, 1.f, DeltaSeconds);
}
RootYawOffsetMode = ERootYawOffsetMode::BlendOut;
这段逻辑会在每帧去检测,同时在每帧结束时把旋转偏移模式设置为移动状态。需要在ABP_Base中的Idle状态里添加Update的监听函数,用来设置旋转偏移模式为Accumulate。
Root Rotation Curve
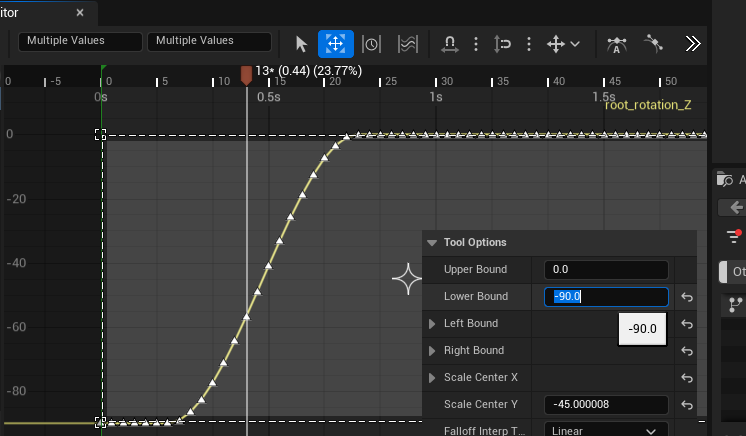
角色每一帧实际旋转多少值可以根据旋转动画获取。这里使用动画变形器MotionExtractorModifier来提取角色根节点在动画中的Yaw轴变化曲线。
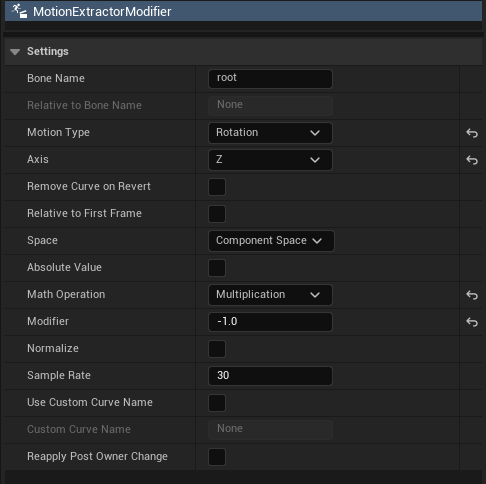
得到曲线:
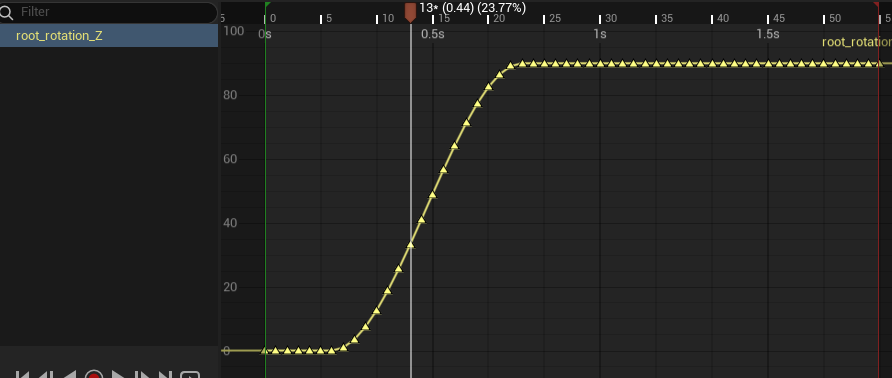
这里需要对曲线的范围做一定的修改,使旋转结束时角度为0,这样便于在设置RootYawOffset时不需要做过多的检测。
Is Turning Curve
程序在旋转角色时,需要在动画播放旋转的期间,也就是说在root_rotation_Z曲线中不为0的时间点都是在旋转。为了更加直观的看出角色是否在播放旋转动画,这里添加了新的动画曲线,来表示角色是否在旋转中。
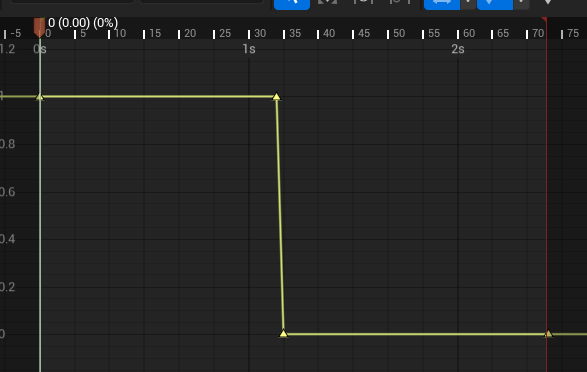
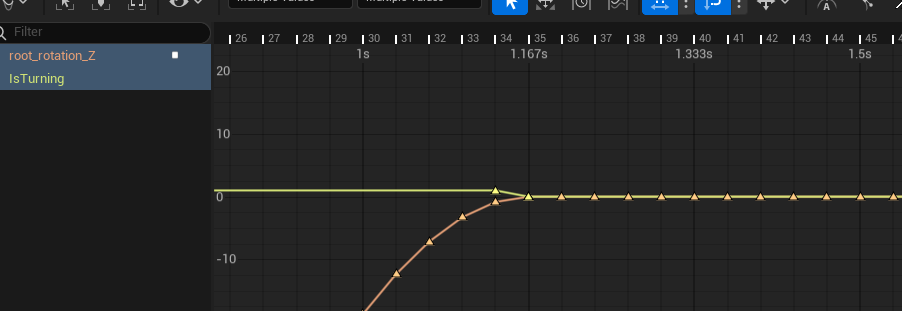
这里自定义了一个动画变形器 IsTurningModifier,逻辑也很简单,从动画最后一帧开始查询与最后一帧根骨骼Yaw轴旋转不同的时间点A,那么A之前就是在旋转,A之后就是为旋转停止。
Process Turn Yaw Curve
有了这两个曲线,可以实时更新RootYawOffset来使角色贴近相机方向。
void ULyraALSAnimInstanceBase::ProcessTurnYawCurve()
{
        LastFrameTurnYawCurveValue = TurnYawCurveValue;
        const float TurningValue = GetCurveValue("IsTurning");
        if (TurningValue < 1.0f)
        {
                LastFrameTurnYawCurveValue = TurnYawCurveValue = 0;
        }
        else
        {
                TurnYawCurveValue = GetCurveValue("root_rotation_Z") * TurningValue;
                if (LastFrameTurnYawCurveValue != 0.f)
                {
                        RootYawOffset = UKismetMathLibrary::NormalizeAxis(RootYawOffset - (TurnYawCurveValue - LastFrameTurnYawCurveValue));
                }
        }
}
同样这段代码会在Idle状态监听的Update方法中调用。每帧减少偏移的数值是动画中两帧旋转数值的差值。
Turn Animation
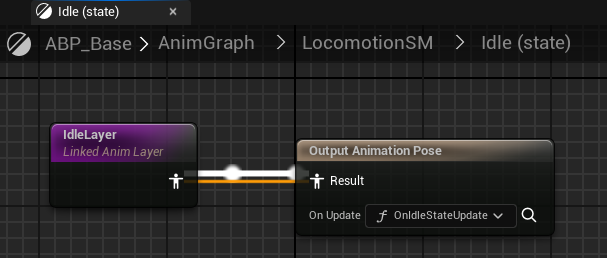
Idle State Machine
在ABP_Layers中把IdleLayer设置为Idle状态机,如下图:
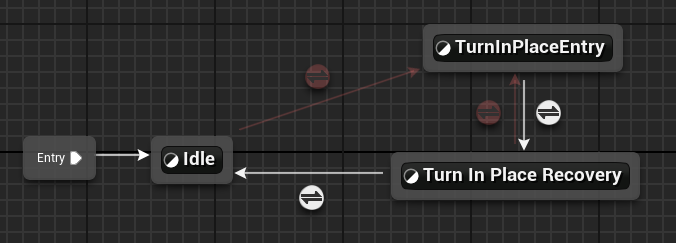
值得注意的是:需要把状态机的Max Transition Per Frame设置为1。
这里为什么会有3个状态,因为角色在转向时,是一个持续性动画,所以在转向的过程中可能会变向。也就是说本身角色需要向左转90度,在转到60度时,这时候又收到指令需要向右旋转90度,那就需要重新选取转向动画。如果只有一个转向的状态就无法满足这个需求。
Turn In Place Entry
这个状态用于播放转向动画中转向的部分,也就是旋转曲线数值不为0的那一部分。
- 进入的条件:为RootYawOffset的绝对值大于50。这个值可以手动调整。
- 退出条件:当IsTurning为0时。也就是说旋转停止了。
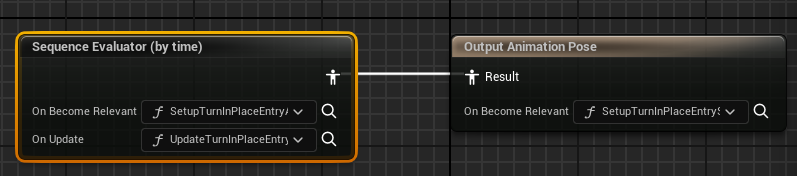
绑定了三个方法:
- SetupTurnInPlaceEntryState:根据RootYawOffset设置转向方向
- SetupTurnInPlaceEntryAnims:根据RootYawOffset和转向方向旋转选择动画
- UpdateTurnInPlaceEntryAnims:推进旋转动画的播放
在该状态中需要记录选择的动画和播放的时间。
Turn In Place Recovery
这个状态主要就是播放旋转动画中的一小段待机动作,其中进入该状态不需要设置过渡时间,因为是于Turn In Place Entry状态播放的同一个动画,就是接着上一个状态继续播放即可。
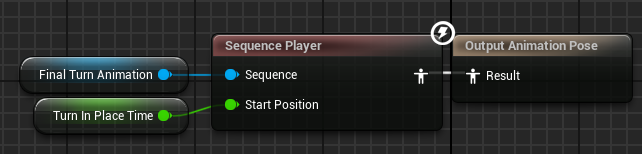
退出条件:
- 为RootYawOffset的绝对值大于50。这个值可以手动调整。
- 旋转动画播放完成
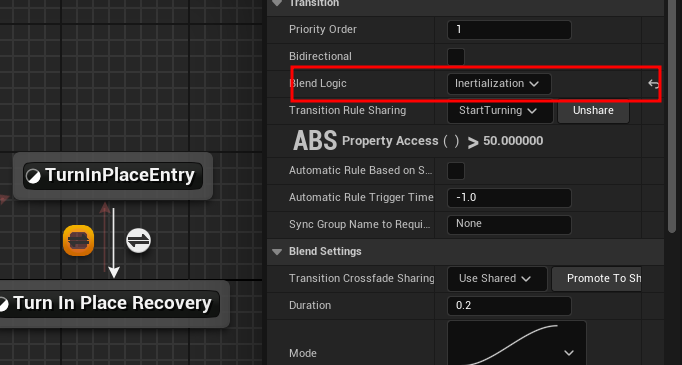
在旋转180度时,会出现插值混合的问题。可以使用惯性化混合解决这个问题。
Crouch Animation
蹲伏包括前面的所有功能,只是在不同的状态中把原有的动画替换为蹲伏即可。同时在Gate中添加一个新为Crounching。这样可以根据角色当前的Gate来选择不同的动画。
Switch Crouch
按键触发切换蹲伏:
void ALyraALSPlayerController::OnCrouchInput(const FInputActionValue& InputActionValue)
{
        switch (LyraALSCharacterBase->GetCurrentGate())
        {
                case EGate::Walking:
                case EGate::Jogging:
                        LyraALSCharacterBase->SwitchGate(EGate::Crounching);
                        break;
                case EGate::Crounching:
                        LyraALSCharacterBase->SwitchGate(EGate::Jogging);
                        break;
        }
}
直接使用角色自带的蹲伏功能即可。
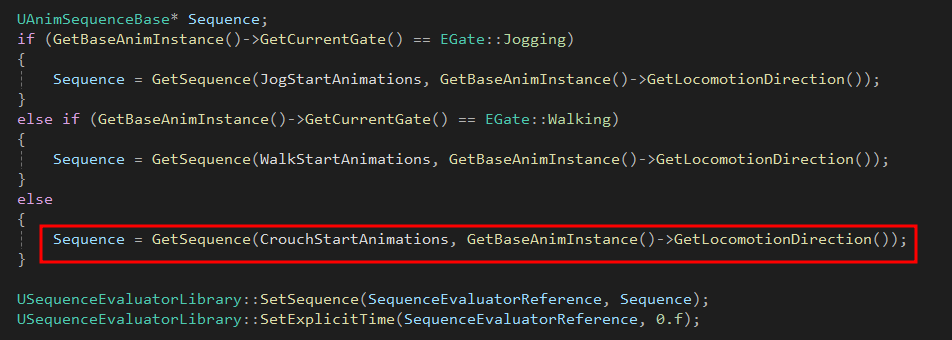
Select Animation
只需要在原有系统中加入对 EGate::Crouching 的处理即可。如下:
Stance Transition
把Idle状态转换为状态机,用来做站立和蹲伏之间的切换。
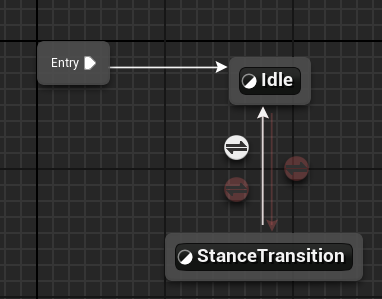
在Stance Transition中只播放进入蹲伏和退出蹲伏动画。蹲伏的待机还是在Idle状态中。
Jump Animation
跳跃是一个相对来说比较独立的模块,它的动画由多个状态组成,逻辑直接使用角色知道的Jump方法即可。同时从高处落下也是使用该模块。
Logic
在按键按下时直接触发 Character->Jump ,在按键完成时触发 Character->Stop 。
Jump Info
动画蓝图会使用到三个跳跃的状态数据,每帧都会刷新:
- bIsInAir = CharacterMovementComp->IsFalling();
- bIsJumping = CharacterVelocity.Z>0 && bIsInAir;
- bIsFalling = CharacterVelocity.Z<0 && bIsInAir;
Time To Jump Apex
角色跳跃到最高点所需要的时间,计算方式:角色Z轴的速度除以Z轴的重力即可。只在角色时跳跃时计算
if (bIsJumping)
{
    TimeToJumpApex = -CharacterVelocity.Z / CharacterMovementComp->GetGravityZ();
}
else
{
    TimeToJumpApex = 0.f;
}
该值作为跳跃循环状态切换到跳跃最高点状态的条件。
Ground Distance
角色离地面的距离,使用射线碰撞获得该值。
void ALyraALSCharacterBase::UpdateGroundDistance()
{
        if (GetWorld() == nullptr)
        {
                return;
        }

        if (GetCharacterMovement()->IsFalling())
        {
                FHitResult OutHit;

                FVector Start = GetActorLocation() - FVector(0.f, 0.f, GetCapsuleComponent()->GetScaledCapsuleHalfHeight());
                FVector End = GetActorLocation() - FVector(0.f, 0.f, 1000.f);
                if (GetWorld()->LineTraceSingleByChannel(OutHit, Start, End, ECollisionChannel::ECC_Visibility) && AnimationInterface)
                {
                        AnimationInterface->ReceiveGroundDistance(OutHit.Distance);
                }
        }
}
State Machine
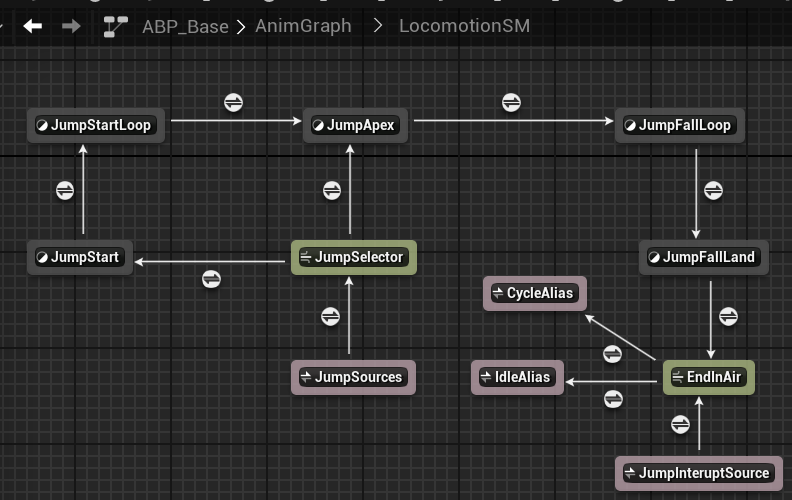
这些状态在基础动画蓝图中的移动状态机里,同时这些状态分为三类:
- 粉色:匿名状态
- 绿色:选择器
- 灰色:状态
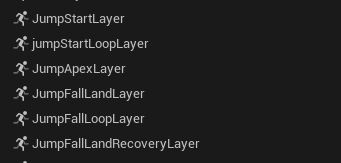
接下来会按照状态流程依次介绍每个状态,每个状态一一对应着一个动画层。
Jump Sources
从其他状态进入跳跃模块的入口点,其他状态有:
- Idle
- Cycle
- Stop
- Start
- Pivot
Jump Selector
通过数据进入对应状态:
bIsJumping:JumpStartbIsFalling:JumpApex
JumpStart

在JumpStartLayer中使用Sequence Player直接绑定对应的动画,播放结束进入JumpStartLoop
JumpStartLoop
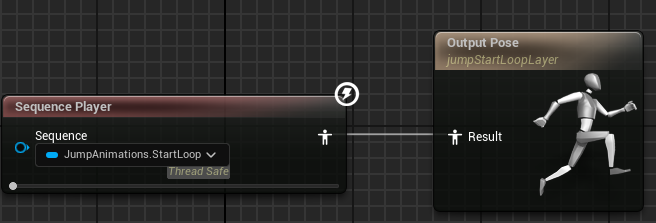
在JumpStartLoopLayer中使用Sequence Player直接绑定对应的动画,当跳到最高的时间TimeToJumpApex小于特定值时,进入JumpApex。
JumpApex
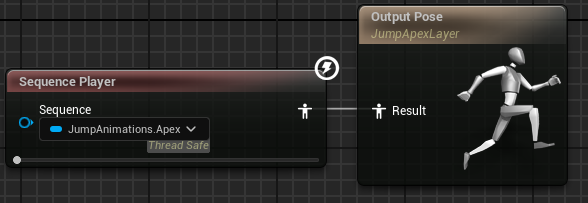
在JumpApexLayer中使用Sequence Player直接绑定对应的动画,播放结束进入JumpFallLoop。
JumpFallLoop
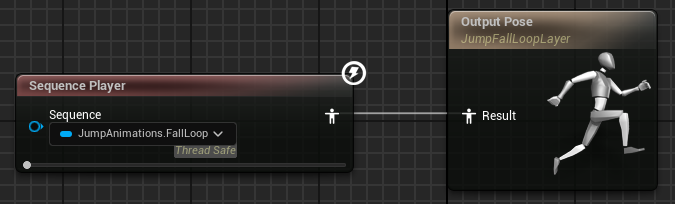
在JumpFallLoopLayer中使用Sequence Player直接绑定对应的动画,当GroundDistance小于一个特定的值时,进入JumpFallLand。
JumpFallLand
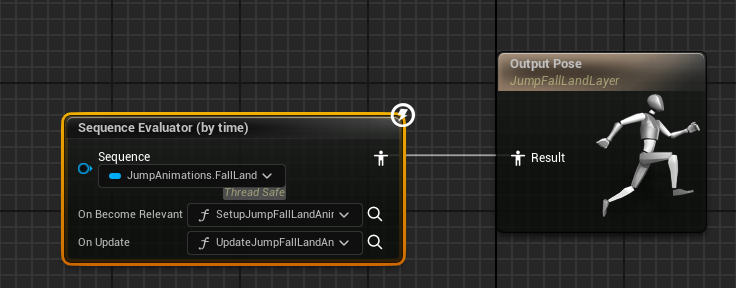
在JumpFallLayer中使用Sequence Evaluator播放绑定对应的动画。该播放器绑定了两个方法:
- SetupJumpFallLandAnims:在播放开始时,设置播放动画时间点为0。
- UpdateJumpFallLandAnims:根据GroundDistance数值,每帧动态调整动画播放的时间点。这使用到了DistanceMatching,匹配的距离是在动画中设置的Z轴下来曲线。在角色的状态不在空中时进入到EndInAir选择状态。
EndInAir
结束空中状态后,根据角色当前的水平方向的速度决定去以下两个状态:
- Cycle:速度大于0
- Idle:速度接近0
JumpInteruptSource
当然在角色执行跳的过程中,也会突然结束角色在空中这个状态。比如说角色跳台阶,可能角色还在播起跳循环时,角色已经落到更高的台阶上了,就不需要下落的动画了,直接进入EndInAir状态即可。以下几个跳跃的状态可以被打断:
- JumpStart
- JumpApex
- JumpStartLoop
- JumpFallLLoop
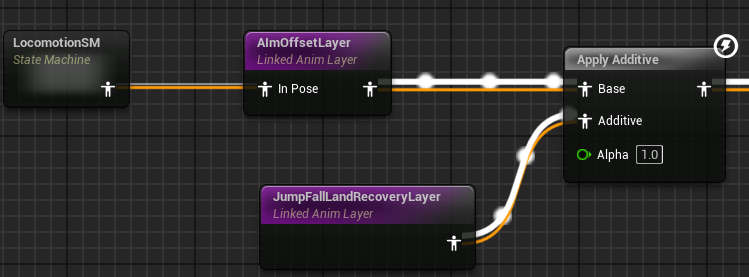
Jump Fall Land Recovery
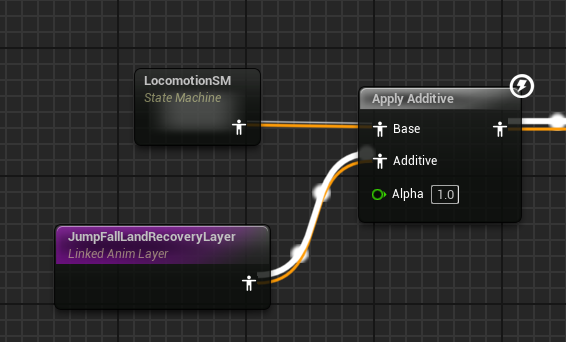
角色在落地后,一般会有一个落地反馈动画。这个动画并没有放在整个跳跃的状态机里,因为角色在下落后可能会立马进入移动状态,如果加一个反馈动画,这样会让移动等一会响应,这就很呆。所以把这个动画做成叠加动画呈现到角色上,在基础动画蓝图中如下:
Time Falling
角色下落到地面所花费的时间。作为落地反馈动画叠加的插值。计算方式只需要在角色处于下落时,加上变换时间即可。
if (bIsFalling)
{
    TimeFalling += DeltaSeconds;
}
else
{
    if (bIsJumping)
    {
        TimeFalling = 0.f;
    }
}
这个值是需要每一帧计算的。
JumpLandRecoverySM
在JumpFallLandRecoveryLayer中使用状态机来旋转播放下落反馈动画。
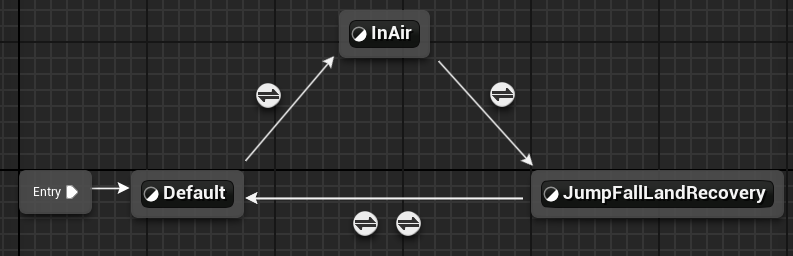
因为叠加动画是放在Locomotion状态机后面,换句话说这个叠加动画是常态存在的,所以需要设置在特定的情况下播放反馈动画。
其中Default和InAir状态中并没有什么动画,跳转条件如下:
- Default->InAir:bInAir为真
- InAir->JumpFallLandRecovery:bInAir为假
- JumpFallLandRecovery->Default:
- bInAir为真,优先级1
- 叠加动画播放完,优先级2
JumpFallLandRecovery状态的逻辑如下:
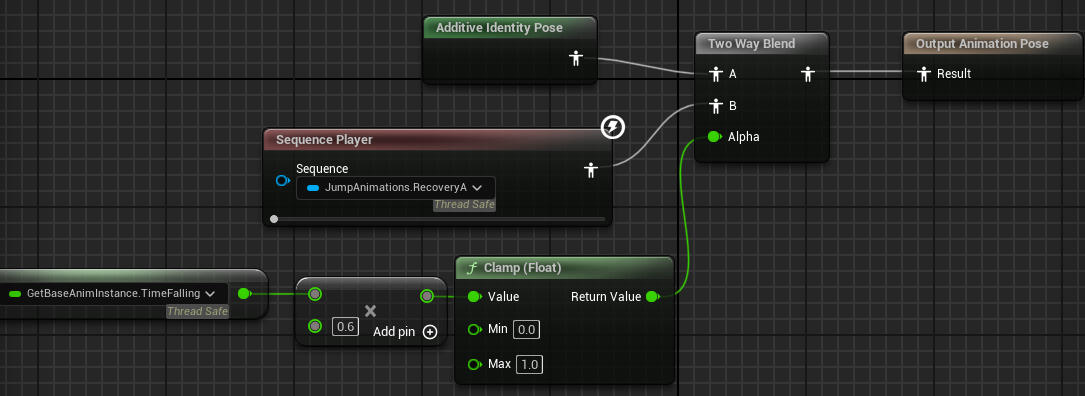
反馈动画和默认叠加动画进行混合,混合的程度由下落时间决定。其中Additive Identity Pose就是一个空的叠加姿势,主姿势叠加该姿势就是主姿势。
参考:https://forums.unrealengine.com/t/what-is-ls-ref-pose-and-additive-identity-posefor/478394/5
Sync Group
主要解决两个不同周期动画混合时,出现因为人物姿势巨大的不同产生跳跃感的问题。这种情况多出现在角色从步行到跑步过渡时,角色脚不同位置产生的跳跃感。
| 同步组关闭 | 同步组打开 |
|---|---|
 |  |
之前在项目中遇到一个问题,角色在频繁转向时的脚步声会播重复,使用同步组可以解决这个问题。因为播放脚步声是使用动画通知,由于动画比较短,转向时会切动画,这时就会触发动画通知。如果频繁切动画,动画通知就会多次触发,声音就会重叠。同步组会抑制跟随者的动画通知,这样就可以减少不必要的通知。
Group
以下几种动画状态设置为同一个组,几个状态的角色如下:
- Cycle: Always Follower
- Pivot : Always Leader
- Start: Can be Leader
- Stop: Can be Leader
使用基于标识同步,所以急停、启动、停步都设置为Leader的角色。
SyncMarkerAnimModifier
使用该动画变形器,自动为动画添加脚步同步标识。在使用该变形器时需要关闭动画的force Rootlock选项,同时通话启动Root Motion。
Aim Offset
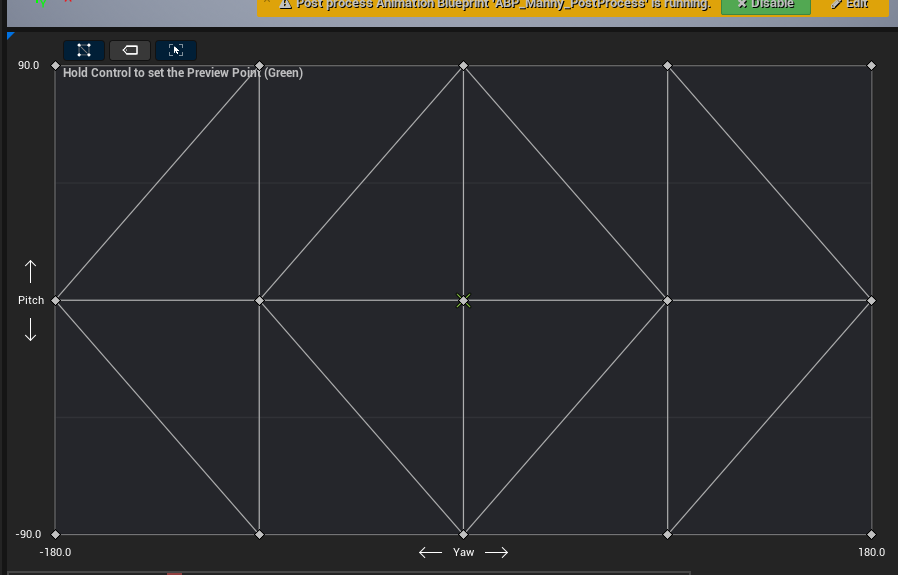
瞄准偏移,存储了一系列可混合的姿势,用于帮助角色瞄准武器。可以理解为一种特殊的混合空间,其中每个动画改为特定的姿势。这瞄准的姿势都是叠加到角色的当前姿势上。
Logic
瞄准偏移主要分为两个轴:
- Yaw:直接使用Turn In Place里使用的RootYawOffset,这个值需要取一下反。
- Pitch:直接使用 Pawn->GetBaseAimRotation().Pitch ,他底层也是直接使用的Controller的旋转。
Animation Setting
Sequence
每一个Sequence中都需要设置叠加动画,设置基础姿势都会对应武器正象的姿势:
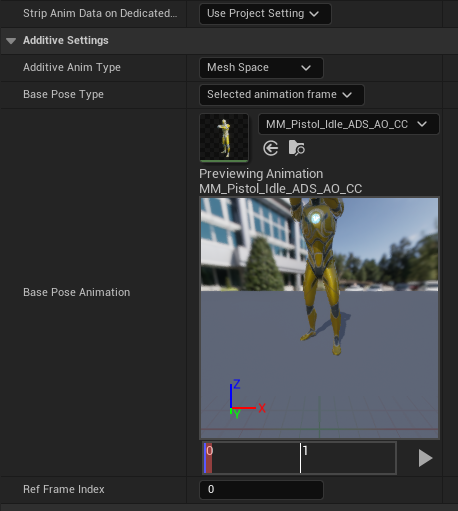
在AO中可以设置Grid Divisions来方便吸附动画配置。
ABP Base
因为是叠加动画,所以AimOffsetLayer不需要放在Locomotion状态机里,直接放在最外层, Locomotion之后即可。
AimOffsetLayer
只需要把参数和动画传入AimOffset Player即可:

参考:
Foot Placement
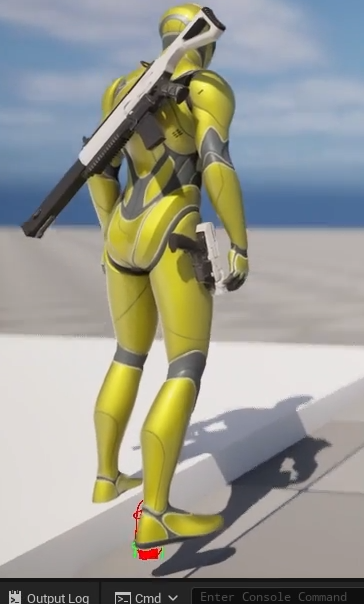
解决了图中脚没有放在地面上的问题,这是一个UE5全新的节点,集合SlopeWar平,FootLock和IK预算等功能。在ABPBase中使用如下:
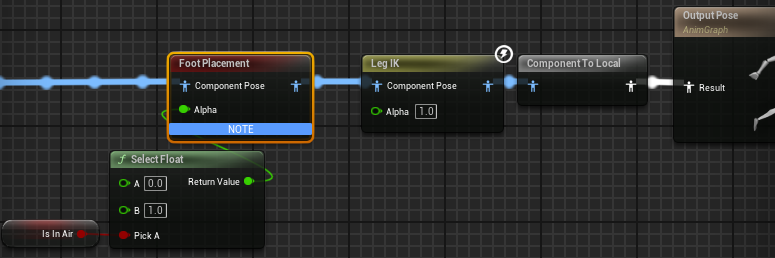
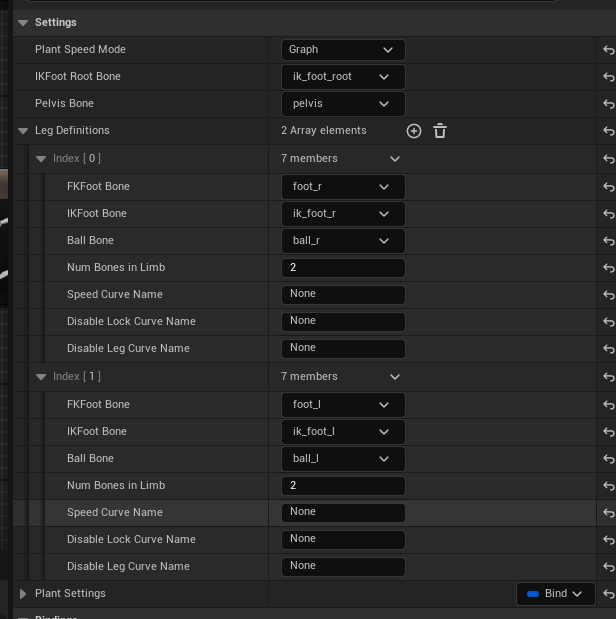
具体的设置:
详细的介绍可以看这篇文章:https://zhuanlan.zhihu.com/p/687084876
Blend Options
Blend Profile
混合描述(Blend Profiles) 可以添加至骨骼,用于定义每个骨骼的混合速度,从而让一些骨骼比其它的骨骼更快混合。
UE默认有一个FastFeet的选项,可以用于从Idle状态过渡到Start状态。它的效果是开始混合下半身。
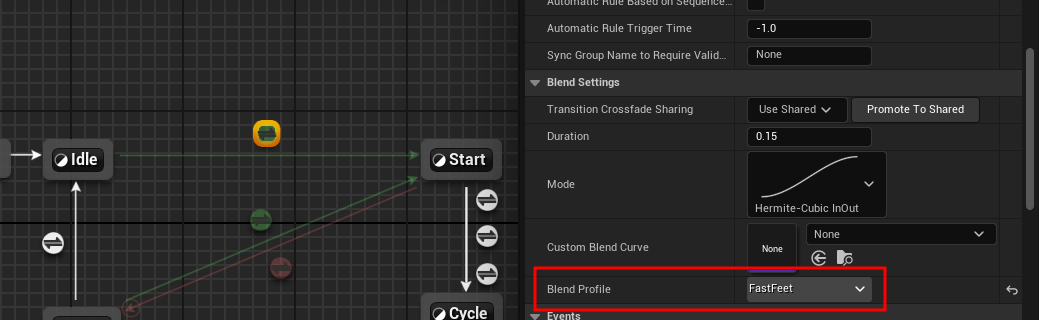
在骨骼中可以看到FastFeet的配置如下:

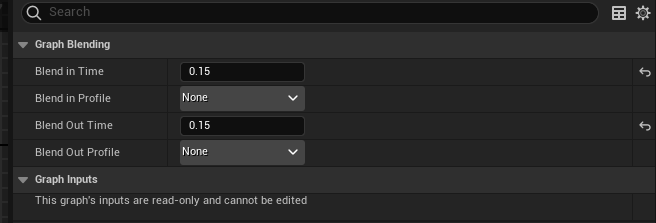
Blend Layers
切换不同的动画层时,会出现闪烁的问题,可以配置层级混合时间,来解决这个问题。因为在ABP_Base中使用了惯性化插值,所以这里配置混合时间是可以起作用的。每个动画层上都可以配置混合时间和混合描述:
Weapon
开枪动画使用蒙太奇播放,使用叠加的方式混合进入当前人物姿势。
Hand IK
具体动画蓝图如下:
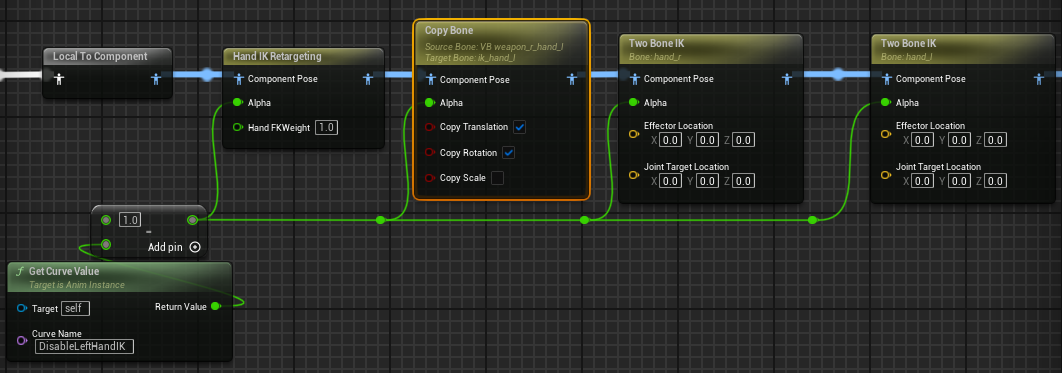
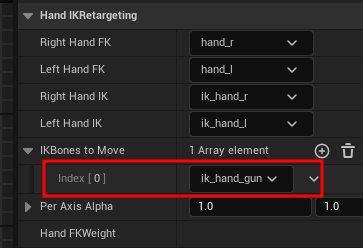
使用Hand IK Retargeting节点修正持枪手的骨骼位置,防止手臂的拉伸。设置以右手为基准,移动左手对齐右手。移动到的点为 ik_hand_gun 。
左手只是跟随了右手的移动,同属需要保持枪到左手的位置。这里新建虚拟骨骼VB_weapon_r_hand_l ,从右手武器点到左手。

每一帧把该骨骼位置和旋转信息复制 ik_hand_l 骨骼上。最后使用Two Bone Ik节点应用ik_hand 骨骼信息到 hand 骨骼链上。
添加一个开关, 来设置是否启用手部IK,通过在动画上设置曲线值来实现。比如在换弹时,不需要应用手部IK,这样可以在换弹动画中设置曲线如下:

Hand IK Retargeting 文档:https://dev.epicgames.com/documentation/en-us/unrealengine/animation-blueprint-hand-ik-retargeting-in-unreal-engine
Upper Body
实现边走边换弹的功能,需要使用到上下半身分别混合。具体蓝图如下:
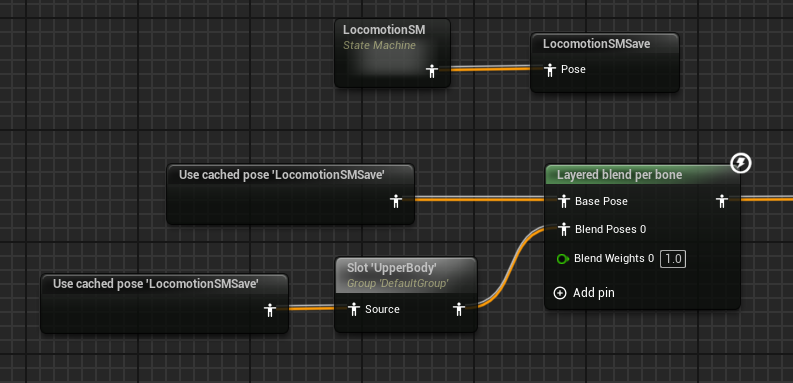
换弹动画使用蒙太奇来播放,并把蒙太奇的插槽标记为上半身。使用 Layered blend per bone节点实现上下半身分别混合,该节点配置如下:
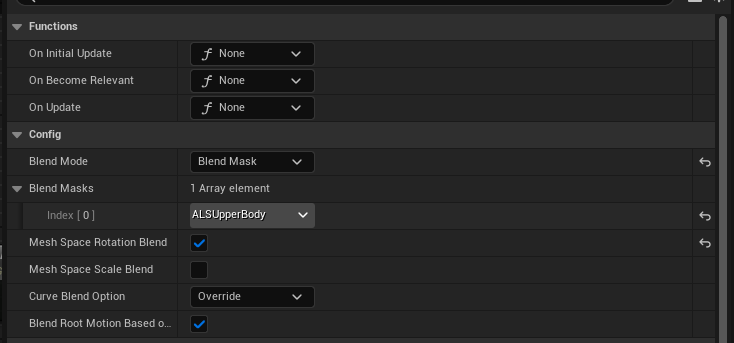
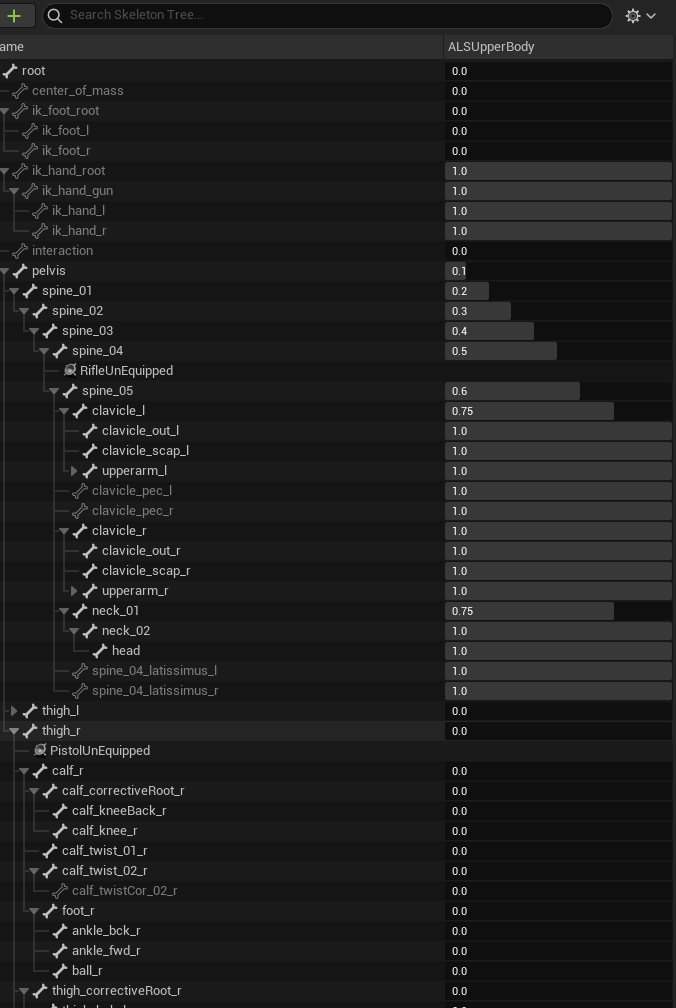
这里使用了混合遮罩来进行控制上半身混合, ALS Upper Body 遮罩配置如下:
Max Transitions Per Frame
该数字定义了单个帧或更新中可以发生的转换或 决策 数量。如果你的状态机有许多状态和转换,其中多个转换可以在给定时间均成立,可能需要将该数字设置为 1 。这样一来,一次只能做出一个决策,防止多个决策和转换彼此竞争。
在该项目中所有的状态机都把这个数值设置为1了,以确保过渡的状态没有被跳过。